


Signs Hardwood Floors Need Refinishing: A Homeowner's Guide
- Kim M.

- 2 days ago
- 9 min read
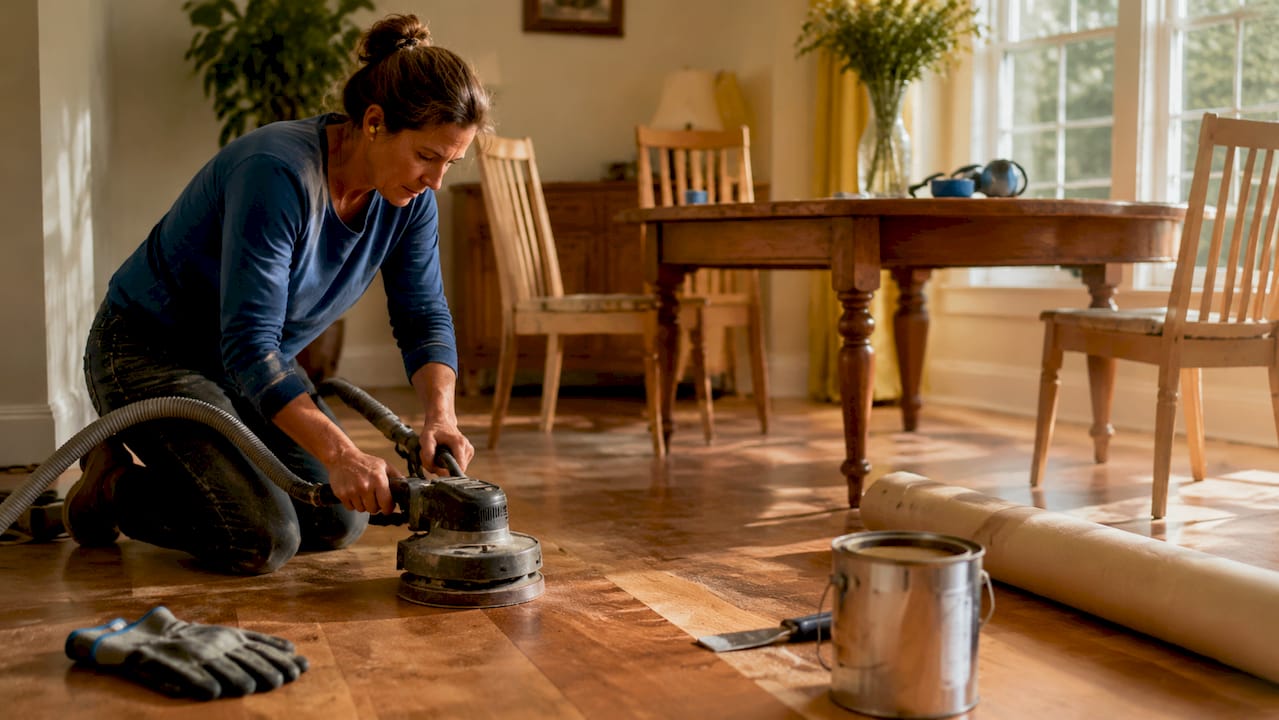
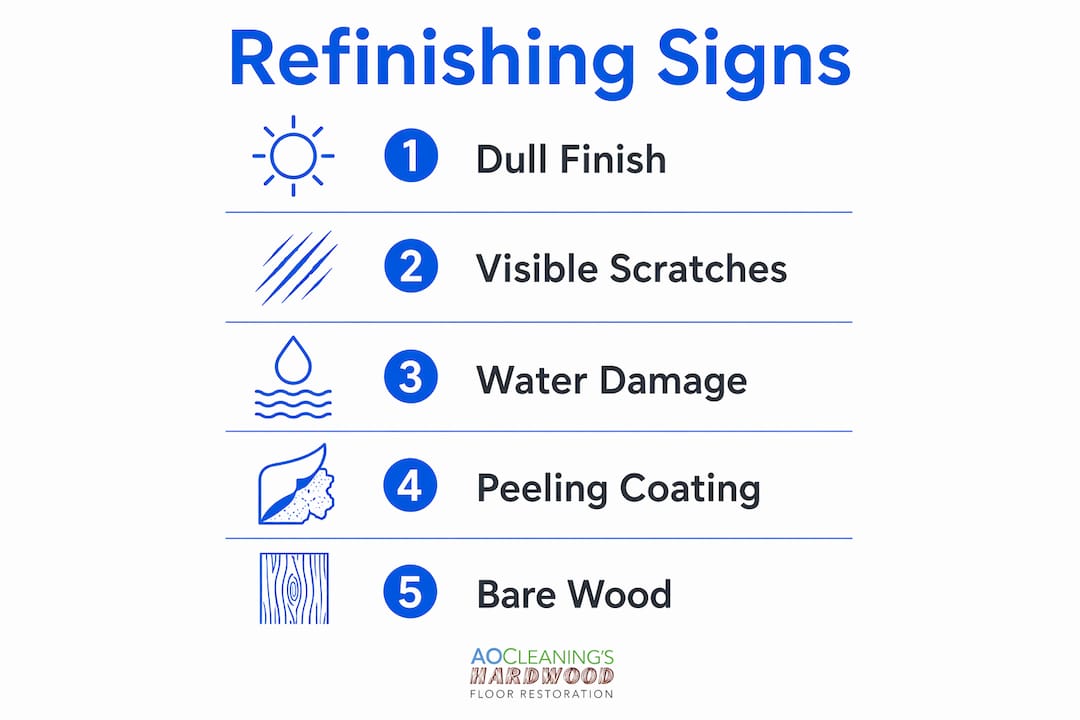
Hardwood floor refinishing is the process of sanding down the existing finish and applying a fresh protective coat to restore the wood’s appearance and durability. The signs hardwood floors need refinishing include visible scratches exposing bare wood, a dull or gray surface that no longer reflects light, water stains that have darkened the grain, and finish that peels or flakes underfoot. Catching these indicators early is the difference between a one-day restoration and a full floor replacement. Properly maintained finishes last 10–20 years, but high-traffic households can see wear much sooner.
What are the signs your hardwood floor finish is wearing off?
Finish wear is the first and most common indicator that your floors need attention. The protective layer on hardwood floors does not fail all at once. It fades gradually, and the earliest signs show up in the areas you walk most.
Dullness and sheen loss are the clearest early warnings. A healthy finish reflects light evenly across the floor. When the finish thins out, the surface looks flat and lifeless, no matter how much you clean it. You will notice this most in hallways, in front of the kitchen sink, and at the base of staircases.
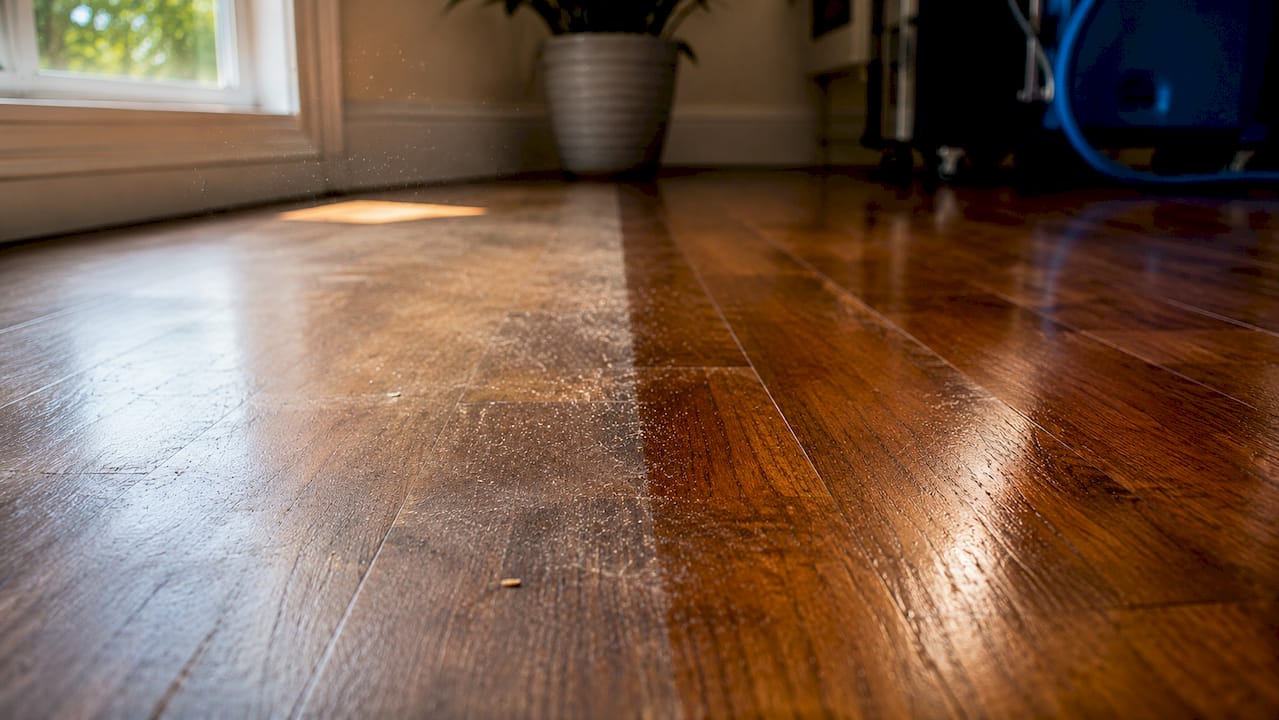
Fading and graying signal a more serious problem. Gray wood means the finish is gone and the wood itself is oxidizing. Graying wood indicates finish loss and oxidation, and if left untreated, it progresses to irreversible rot and black staining. That is not a cosmetic issue anymore. That is structural damage.
Here are the most common finish-related warning signs to look for:
Flat, chalky appearance in high-traffic zones
Uneven sheen where some areas look shiny and others look dull
Gray or silver discoloration along the wood grain
Finish that feels rough or gritty underfoot
Color fading near windows from UV exposure
Pro Tip: Before calling a professional, run the water droplet test. Drop a few tablespoons of water on the floor. If the water beads on the surface, the finish is intact. If it absorbs into the wood and darkens it within a few minutes, the finish has failed and refinishing is needed.
One nuance worth knowing: wax buildup causes yellowing, sticky surfaces, and uneven sheen, and it can look almost identical to finish failure. The difference matters because wax requires professional stripping before any new finish will adhere properly. If your floor looks dull but feels slightly tacky, wax buildup may be the culprit rather than a worn finish.
How do you tell if the damage is in the wood or just the finish?
Not every scratch means you need a full sand and refinish. The depth of the scratch determines the right repair. Learning to read your scratches saves you time and money.
Surface scratches live entirely within the finish layer. They look white or light gray because they scatter light differently than the surrounding finish. The key test: wet the scratch with a damp cloth. If it disappears when wet and reappears as it dries, the scratch has not reached the wood. These can often be addressed with a screen-and-recoat rather than full sanding.
Deep scratches are a different story. They cut through the finish and into the raw wood fiber. When you wet a deep scratch, it stays visible or even darkens because the bare wood absorbs the moisture. Pet claws, high heels, and furniture legs dragged across the floor are the most common causes of this type of damage.
Here is a quick way to categorize what you are dealing with:
White or light scratches that disappear when wet: surface finish damage, screen-and-recoat may be sufficient
Dark scratches that stay visible when wet: bare wood exposed, full refinishing likely needed
Wide gouges or dents: structural wood damage, assess for spot repair or full refinishing
Scratches covering more than 30% of the floor area: full refinishing is the most practical solution
Pro Tip: Run your fingernail across the scratch. If your nail catches and drops into the groove, the scratch has gone through the finish and into the wood. If your nail slides over it smoothly, it is a surface scratch in the finish layer only.
Not all scratches require full sanding. A screen-and-recoat is viable when the finish is not completely worn through. Knowing the difference before you call a contractor puts you in a much stronger position to ask the right questions and avoid paying for more work than you need.
When do water stains and peeling finish mean you need to act fast?
Water is hardwood’s worst enemy, and the damage it causes follows a predictable pattern. Recognizing where your floors fall on that spectrum tells you how urgently you need to act.
White rings or cloudy patches are the least serious water signs. These form when moisture gets trapped between the finish layers but has not yet reached the wood. They are surface-level and can sometimes be buffed out without full refinishing.
Dark stains or black spots mean water has penetrated the finish and soaked into the wood grain. The wood has absorbed moisture and begun to oxidize. This requires sanding down to bare wood to remove the stain entirely.
Peeling or flaking finish signals that moisture has gotten underneath the finish and broken the bond between the coating and the wood. You will see this as bubbling, curling edges, or sections of finish lifting away from the surface.
Cupping or warping boards indicate that water has reached the subfloor. Individual boards will look concave or convex, and gaps may appear between them. This is the most serious stage and may require board replacement before refinishing.
Immediate action is critical once bare wood is exposed. Delays increase the sanding depth required and raise the complexity of the restoration. Contaminants embed deeper into the wood every day, which means a problem that costs $500 to fix today could cost $2,000 to fix in six months. Address water damage signs the moment you spot them.
Refinishing vs. recoating vs. replacement: which one do you need?
Understanding your options prevents you from overspending on a full refinish when a recoat will do, or underspending on a recoat when the floor actually needs sanding. The refinishing vs. replacement decision comes down to how deep the damage goes.
Sign You See | Recommended Action | Relative Cost |
Dull finish, no bare wood | Screen-and-recoat | Lowest |
Light surface scratches | Screen-and-recoat | Lowest |
Deep scratches, bare wood visible | Full sand and refinish | Moderate |
Water stains, gray discoloration | Full sand and refinish | Moderate |
Warped, cupped, or rotted boards | Board replacement + refinish | Highest |
Structurally compromised subfloor | Full floor replacement | Highest |
Screen-and-recoat involves lightly abrading the existing finish and applying a new topcoat. No sanding down to bare wood. This works when the finish is intact but worn thin, and there are no deep scratches or stains. It extends the life of your floor by several years at a fraction of the cost of full refinishing.
Full sand and refinish removes all existing finish, sands the wood surface smooth, and applies multiple new coats of finish. This is the right call when bare wood is exposed, stains have penetrated the wood, or the floor has not been refinished in over a decade.
Replacement is necessary when boards are structurally damaged, severely warped, or when the wood has been sanded so many times that there is not enough material left to sand again. Professional hardwood refinishing costs 30–50% less than full floor replacement. That gap is significant enough that refinishing should always be evaluated first.
Pro Tip: Ask your contractor to measure the remaining wood thickness before recommending replacement. Most solid hardwood floors can be sanded 5–8 times over their lifetime. If thickness remains, refinishing is almost always the better financial decision.
What DIY tests tell you it’s time to refinish?
You do not need a contractor to make an initial diagnosis. Two simple tests give you a reliable read on your floor’s condition before you make any calls.
The water droplet test. Pour two tablespoons of water onto the floor in a high-traffic area. Wait three minutes. If the water beads up and stays on the surface, the finish is protecting the wood. If the water soaks in and the wood darkens, the finish has worn through and refinishing is needed.
The fingernail scratch test. Find an existing scratch and drag your fingernail across it. A smooth glide means the scratch is in the finish only. A catch or drop into the groove means bare wood is exposed.
The light angle test. Crouch down and look across the floor at a low angle with a flashlight. Finish wear, scratches, and uneven surfaces become much more visible from this angle than when standing upright.
The traffic pattern check. Walk the floor and note where it looks different from the rest. High-traffic areas show finish failure as early as 5–7 years after refinishing. If the kitchen and hallway look noticeably worse than the bedroom, the finish is failing unevenly and the floor needs attention.
Once bare wood is visible, do not wait. Water absorption and foot traffic embed contaminants deeper into exposed wood daily, causing oxidation that makes restoration harder and more expensive over time. Call a professional for an assessment as soon as your DIY tests confirm bare wood exposure.
Pro Tip: Run all three tests in multiple spots across the floor, not just one area. Finish wear is rarely uniform. A floor can pass the water test in the bedroom and fail it in the hallway on the same day.
Key takeaways
Recognizing the signs hardwood floors need refinishing early protects the wood structure and keeps restoration costs far below the price of full replacement.
Point | Details |
Water droplet test is your first step | If water absorbs into the wood and darkens it, the finish has failed and refinishing is needed. |
Scratch depth determines the repair | Surface scratches that disappear when wet need a recoat; scratches that stay visible need full sanding. |
Gray wood signals urgent action | Graying means oxidation has started; untreated, it leads to rot and irreversible structural damage. |
Refinishing costs far less than replacement | Professional refinishing runs 30–50% less than replacing floors, making it the smarter first option. |
Wax buildup mimics finish failure | Yellowing or sticky floors may need wax removal, not refinishing; the treatment is different and matters. |
What 20 years of floors taught me about waiting too long
The most expensive mistake I see homeowners make is waiting until the floor looks terrible before calling anyone. By that point, what could have been a screen-and-recoat has turned into a full sand and refinish, or worse, board replacement.
The second most expensive mistake is misreading wax buildup as finish failure. I have seen homeowners sand floors that did not need sanding because they did not know the difference. Wax buildup requires stripping, not sanding. Sanding a waxed floor without removing the wax first creates adhesion problems with the new finish, and you end up doing the job twice.
DIY refinishing is tempting, especially when you see the cost comparison between DIY and professional work. The upfront savings look real. But drum sanders in the hands of someone without experience can cut through the finish layer and into the wood in seconds, leaving permanent low spots that no amount of finish will hide. The risk is not theoretical. I have seen it happen on floors that were in perfectly good shape before the homeowner rented a sander.
My honest advice: run the water droplet test and the fingernail test yourself. If either one confirms bare wood exposure, call a professional for an assessment before you do anything else. A good assessment is free or low-cost, and it tells you exactly what level of service you actually need. You might walk away knowing a $300 recoat will solve the problem. That is worth a phone call.
— Jim
Aosaveswoodfloors can restore your floors before you replace them
If your floors are showing any of the signs covered in this guide, Aosaveswoodfloors has been solving exactly these problems for homeowners across St. Louis, Columbia, Belleville, and central Illinois since 2003.
Aosaveswoodfloors offers screen-and-recoat, full sand and refinishing, wax removal, and 1-day restoration services using dustless equipment and eco-friendly products. Most jobs are done in a single day, with floors ready to walk on in about three hours. With 450+ Google reviews and over 20 years in business, they are the most trusted hardwood floor restoration team in the region. Before you spend money on new floors, call Aosaveswoodfloors first. They also offer countertop cleaning, polishing, and sealing for complete home surface care.
FAQ
How do i know if my floor needs refinishing or just cleaning?
Run the water droplet test. If water absorbs into the wood and darkens it, the finish has failed and refinishing is needed. If water beads on the surface, a professional cleaning or buff may be all that is required.
How often should hardwood floors be refinished?
Properly maintained finishes last 10–20 years under normal conditions. High-traffic households may need reassessment every 5–7 years, particularly in hallways and kitchens.
Can i refinish hardwood floors myself?
DIY sanding saves 50–60% upfront but risks permanent wood damage or poor finish adhesion. Professional refinishing with dustless equipment produces better results and lower long-term risk for most homeowners.
What is the difference between refinishing and recoating?
Recoating adds a new topcoat over the existing finish without sanding down to bare wood. Refinishing sands the floor to bare wood and starts fresh. Recoating works for light wear; refinishing is required when bare wood is exposed or stains have penetrated the wood.
What does graying wood mean on hardwood floors?
Gray coloring means the finish is gone and the wood is oxidizing. Left untreated, graying progresses to black staining and rot. It is one of the most urgent signs that professional restoration is needed immediately.
Recommended


Comments