


Hardwood Floor Refinishing Project Checklist for Homeowners
- Kim M.

- 3 days ago
- 9 min read

Before your first sanding pass touches the floor, the outcome of your refinishing project is already being decided. A hardwood floor refinishing project checklist — what professionals call a floor restoration preparation guide — is the difference between a smooth three-day job and a drawn-out nightmare full of redos and damage control. Most homeowners focus on the finish color and forget the dozen preparation steps that actually determine how the final result looks and holds up. This article walks you through every critical step, from clearing rooms to timing your finish coats correctly.
Table of Contents
Key Takeaways
Point | Details |
Start with environment control | Keep temperature at 65–75°F and humidity at 35–50% before and during the project for proper curing. |
Clear rooms completely | Remove all furniture, rugs, decor, and closet contents before the crew arrives to avoid delays and damage. |
Timing between coats matters | Wait at least 3 hours between finish coats and a full week before moving furniture back onto the floor. |
Know your refinishing method | Full sanding suits damaged or stained floors; screening and recoating works only for lightly worn surfaces. |
Vet your contractor carefully | Get written estimates, ask specific questions about dust control, and verify references before committing. |
1. Your hardwood floor refinishing project checklist starts with room clearing
The most common delay on refinishing day is a room that is not ready. Everything must come out before the crew arrives. That means furniture, area rugs, drapes that touch the floor, decor on low shelves, and the contents of any closets that open into the work area.
Pay attention to the less obvious items. Electronics near sanding zones accumulate fine dust inside their vents. Potted plants should move to another level of the house entirely. Anything hanging on walls adjacent to the sanding area can vibrate loose, so take those down too.
Scheduling confirmation one week before the project start date reduces last-minute confusion and gives you time to arrange temporary furniture storage. Treating this as a move-out, not just a tidy-up, is the right mindset.
2. Environmental control: temperature and humidity
This step gets skipped constantly, and it costs homeowners every time. Maintain room temperature between 65 and 75°F and relative humidity between 35 and 50% before, during, and after the project. These numbers are not suggestions.
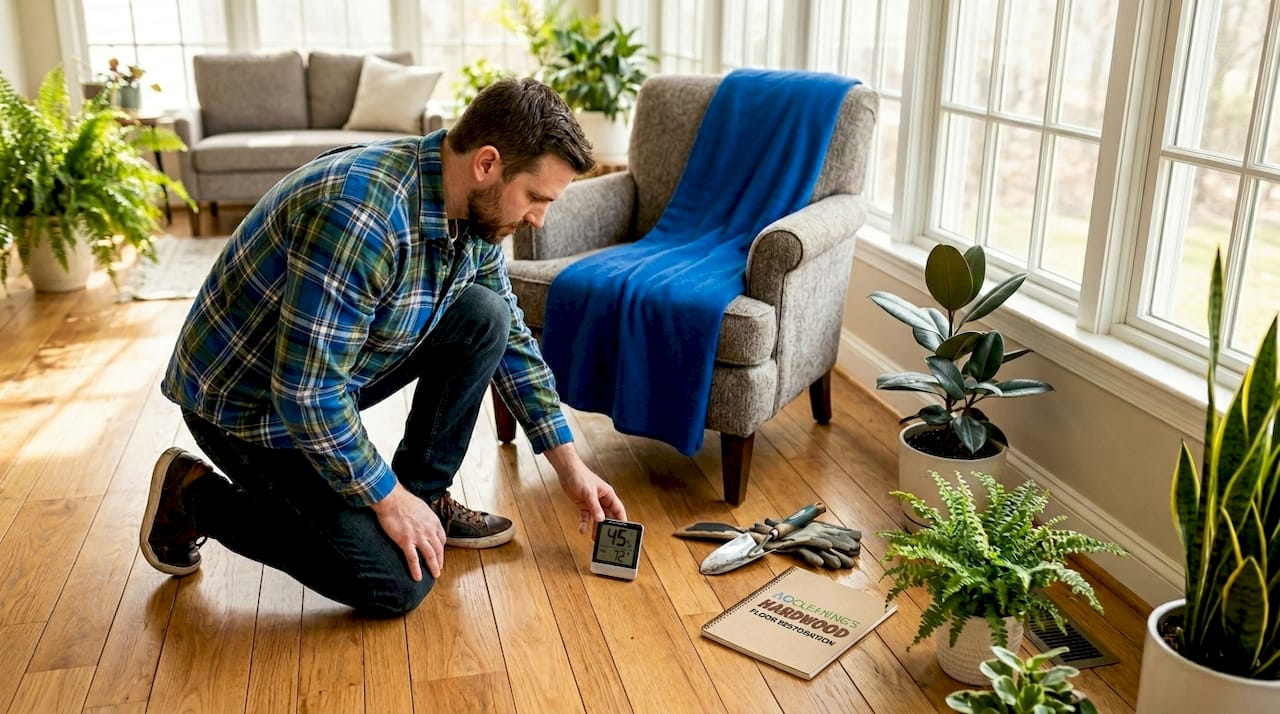
Wood is hygroscopic, meaning it absorbs and releases moisture based on its environment. If humidity spikes during the curing window, your finish can cloud, bubble, or peel within weeks. If the room is too cold, drying times stretch unpredictably and coats may not bond correctly.
Run your HVAC system in the days leading up to the project. If your home swings outside these ranges seasonally, talk to your contractor before scheduling. Forcing a refinishing project in August without air conditioning in a humid climate is a setup for a poor result.
Pro Tip: Borrow or buy a cheap digital hygrometer and place it in the room two days before work starts. If humidity is outside the 35–50% range, address it before your contractor shows up, not after.
3. Dust and noise containment planning
Closing doors and isolating the work area is not just about keeping other rooms livable. It protects items in adjacent spaces and keeps sanding dust from migrating into your HVAC system. Tape plastic sheeting over any forced-air registers in the work zone, and remove any floor-level vents you can access.
Plan crew access before the day starts. Where will equipment enter the house? Is there a clear path from the front door to the work area without crossing freshly finished sections? Clearing that path matters as much as clearing the room.
Move fragile items — art, glass collectibles, anything irreplaceable — at least two rooms away from the work zone. Fine dust travels farther than you expect, even with dustless equipment.
4. Room preparation steps before sanding begins
This is where your floor refinishing prep room checklist gets specific. Work through these steps in order for the best result.
Vacuum the entire floor surface thoroughly with a soft-brush attachment to remove grit and debris.
Clean with a pH-neutral hardwood cleaner using minimal moisture. Vinegar-heavy solutions or wet mopping can saturate wood grain and compromise adhesion.
Inspect for protruding nails or staples and hammer them flush or remove them. A missed nail can tear sandpaper and gouge the floor.
Remove base molding if your project requires edge work close to walls. This lets the sander reach further and creates a cleaner finished edge.
Hand sand perimeter areas with 180-grit sandpaper to prepare the edges that drum sanders cannot reach.
Check for squeaks and loose boards. Address these before sanding begins, not after finish is applied.
Photograph the room from multiple angles. This documents the floor condition before work starts, which protects both you and the contractor.
Pro Tip: If you have a dog or cat, arrange for them to stay elsewhere during the entire project. Pet hair landing in wet finish is nearly impossible to fix cleanly, and paw prints in a fresh coat mean starting that section over.
5. Tools and materials checklist
Whether you are managing a DIY hardwood floor restoration or overseeing a contractor, knowing what equipment belongs on site keeps you from being surprised mid-project.
Sanding equipment:
Drum sander for main floor fields
Orbital or belt edger for perimeter areas
Random-orbit buffer for finish application prep
Sandpaper in grits ranging from 36 to 120 (coarse to fine, used in sequence)
Dust management:
Shop vacuum with a HEPA filter
Microfiber tack cloths for collecting fine particles between coats
Plastic sheeting and tape for sealing vents and doorways
Finishing and staining:
Lambswool applicators or synthetic pad applicators for finish coats
Natural bristle brushes for cutting in at edges
Stain applicators and rags for color work if changing the floor tone
Painter’s tape for protecting baseboards and thresholds
Safety gear:
N95 or better respirator, or a full respirator with organic vapor cartridges for oil-based finishes
Safety glasses
Knee pads for hand-sanding work
Disposable shoe covers to avoid tracking debris back onto the prepped floor
A HEPA vacuum matters more than most homeowners realize. Fine sanding dust is genuinely a health concern when it stays airborne, and your regular shop vac without a HEPA filter will blow the finest particles straight back into the air.
6. Understanding the refinishing timeline
The hardwood floor sanding checklist addresses what to do, but the timing checklist addresses when. Getting this wrong is what turns a two-day project into four.
Phase | Timing guidance |
Dust settling after sanding passes | Wait 10–15 minutes before vacuuming and tacking the surface |
Between finish coats | Wait a minimum of 3 hours per coat for proper bonding |
Light foot traffic | Safe after approximately 24 hours with socks only |
Full furniture return | Wait a minimum of one full week |
Area rugs | Do not place back down for 2–4 weeks |
The 3-hour rule between coats is the one most often violated. It feels like a long wait, especially on a project that spans two days, but applying the next coat too early traps solvents underneath and creates a finish that scratches and peels far sooner than it should.
Scheduling the project to end mid-week gives you the weekend to let the floor fully cure before resuming normal household activity. Starting on a Wednesday so the final coat goes down Thursday night and furniture returns the following Wednesday is a realistic, low-stress approach.
Pro Tip: Do not drag furniture back in after just a day or two, even if the floor feels hard underfoot. Finish continues curing beneath the surface for days. A chair leg dragged across a 36-hour-old floor can leave a mark that never fully disappears.
7. Cost factors and contractor selection checklist
Understanding your project costs before calling contractors protects you from surprises and helps you compare bids accurately.
Professional full-sand refinishing costs approximately $3 to $8 per square foot, while a screen and recoat runs $1.50 to $3 per square foot. The gap exists because full sanding removes material and requires significantly more labor and equipment time.
Screening is only appropriate for floors with light surface wear and no bare wood. If your floor has deep scratches, water staining, or you want to change the stain color entirely, full sanding is the only method that works. Using the floor refinishing without sanding approach on a floor that needs full sanding just kicks the problem down the road.
For DIY, expect to spend roughly $400 to $700 for a 500-square-foot space when comparing DIY costs to a professional job running $1,500 to $4,000. The savings are real, but drum sanders are unforgiving. One pass at the wrong angle can gouge through the wear layer permanently. A practical middle ground: hire a pro for sanding and handle the finish application yourself.
Contractor selection checklist:
Ask specifically what dust control system they use and whether it is truly dustless or just reduced-dust
Request a written scope of work, not just a verbal quote
Confirm the number of finish coats included and the product brand
Ask how they handle repairs like loose boards or nail pops before the final quote
Check Google and review platforms for at least 20 recent reviews
Confirm they carry liability insurance and ask to see the certificate
Get a clear re-entry timeline in writing before the project starts
Reviewing maintenance tips for between-service care also helps you protect your refinishing investment once the work is done.
My take: preparation is where floor refinishing is won or lost
I have seen more refinishing projects go sideways from skipped prep than from any technical error. The homeowner who calls back two weeks after a job saying the finish is cloudy almost always had a humidity problem they did not address beforehand. The one who says there are scratches visible from across the room typically rushed furniture back within 48 hours.
What surprises most people is how much the environmental side matters. Temperature and humidity are not contractor concerns that happen off-site. They are your responsibility as the homeowner to establish before anyone shows up with equipment. A contractor who skips asking about your home’s climate conditions is one worth questioning before you sign anything.
My honest advice: treat your floor refinishing project the way you would treat a painting project on an exterior wall. You would not paint in the rain or on a freezing morning. The same logic applies inside, and the consequences of ignoring it show up just as clearly.
Clear communication with whoever is doing the work eliminates most of the friction I see homeowners deal with. Ask every question upfront. Get every timeline commitment in writing. And build in a realistic buffer, because good work is rarely rushed work.
— Jim
Ready to refinish? Let Aosaveswoodfloors take it from here
Pulling together a full floor refinishing preparation checklist is one thing. Having a team that shows up prepared, works clean, and delivers results you can see in the first coat is another.

Aosaveswoodfloors has been handling full sand and refinishing projects across the St. Louis metro and central Illinois since 2003. Every job uses dustless techniques and eco-friendly products, so you are not left with a film of dust on every surface in your home. Stain color selection, finish type, and timeline flexibility are all part of the process. Most restoration services wrap in a single day, with floors ready for light foot traffic in about three hours.
If you are in the St. Louis, Belleville, O’Fallon, or Columbia, IL area and your floors are due for serious attention, Aosaveswoodfloors is worth a call before you price out replacement. Local refinishing service is available across the region, and a consultation costs you nothing.
FAQ
How do I prepare a room before floor refinishing begins?
Remove all furniture, area rugs, low decor, and closet contents from the work area. Confine daily life to non-work zones and seal vents and doorways to contain dust.
How long should I wait between finish coats?
Wait at least 3 hours between each coat of finish for proper bonding and curing. Applying coats too early traps solvents and leads to a finish that scratches and peels prematurely.
What is the difference between full sanding and screen and recoat?
Full sanding removes the entire finish layer and is necessary for damaged floors or stain color changes. Screen and recoat scuffs only the surface and works only on floors with light, even wear and no bare wood showing.
How much does professional hardwood floor refinishing cost?
Full-sand refinishing typically costs $3 to $8 per square foot, while a screen and recoat runs $1.50 to $3 per square foot. Final cost depends on floor condition, square footage, and whether a stain color change is involved.
When can furniture go back on a refinished floor?
Light foot traffic in socks is generally safe after 24 hours. Wait a full week before moving furniture back, and hold off on area rugs for two to four weeks to allow the finish to cure completely.
Recommended

Comments