


Test First Countertop Sealing Frequency for Homeowners, Not Annual Rules

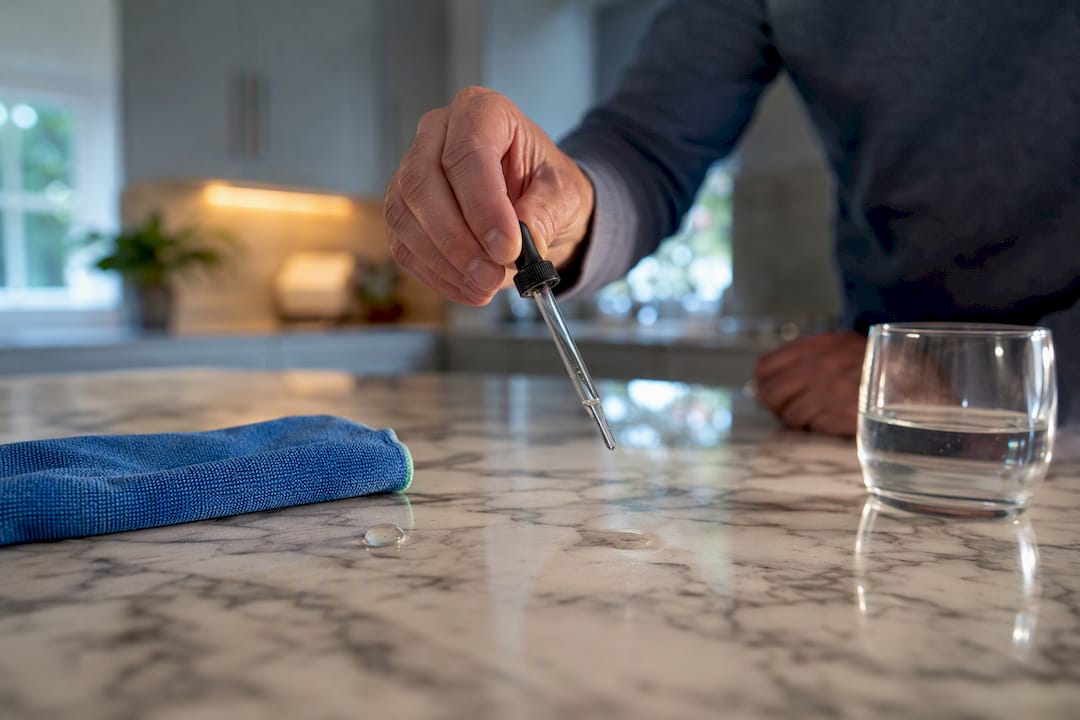
Seal when the stone stops beading water, not on a fixed calendar. As a rule of thumb, marble typically needs resealing every 6 to 12 months, granite every 1 to 3 years, and quartzite every 1 to 2 years, while engineered quartz and porcelain rarely need it at all. The water-drop test tells you exactly where your slab falls in those ranges, because usage and sealer quality shift the timeline more than the calendar does.
TL;DR:
The water-drop test is the most reliable way to determine if a countertop needs resealing, showing absorption within 5 to 15 minutes.
Sealing frequency varies widely based on material porosity, household use, climate, and finish, ranging from every six months for marble to every 1-3 years for granite.
Applying the correct sealer type, cleaning with pH-neutral products, and testing regularly can extend sealant lifespan and prevent stains or etching.
Diy sealing typically costs $20 to $60 and takes a weekend, while professional sealing costs $100 to $300 but offers faster, more consistent results.
Professional services measure your specific needs, handle prep, test the seal, and provide eco-friendly solutions with minimal disruption.
Table of Contents
How Often to Seal Countertops by Material
Countertop sealing frequency depends almost entirely on how porous the stone is and how hard your kitchen works it. A slab in a house with two people cooking twice a week ages differently than the same stone in a kitchen that hosts a family of six every night.
Here’s how the major countertop materials break down:
Granite: Most granite needs sealing every 1 to 3 years. Lighter, more porous granites like some whites and beiges often need attention closer to the one-year mark, while dense dark granites (black galaxy, absolute black) can stretch past three years before they need a fresh coat.
Marble and limestone: These are calcium-based stones with higher porosity, and kitchens push them toward the shorter end of a 6 to 12 month cycle. A marble island that sees daily cooking oil and citrus juice will need resealing more often than a marble vanity top in a guest bathroom.
Quartzite (true): Genuine quartzite generally holds a seal for 1 to 2 years, but density varies wildly by quarry and slab. One caution worth repeating: a lot of stone sold as “quartzite” at big box retailers is actually dolomitic marble with a different porosity profile, so don’t assume your slab behaves like the quartzite in a fabricator’s showroom sample.
Travertine and travertine-filled stone: Expect 1 to 2 years, and check the fill material. Epoxy-filled travertine holds up longer than resin-filled versions, and outdoor travertine exposed to rain and freeze-thaw cycles needs closer monitoring than an indoor kitchen counter.
Soapstone: Skip the penetrating sealer entirely. Soapstone gets conditioned with mineral oil, applied frequently during the first few months to build up a patina, then refreshed every few weeks or as needed once the surface darkens evenly.
Engineered quartz and porcelain: These materials are essentially nonporous by manufacture, and sealing them isn’t just unnecessary, it can actually cause a hazy film that’s harder to remove than the problem you were trying to prevent.
The Water-Drop Test: How to Check if Your Countertop Needs Resealing
Skip the guesswork and run this test on any natural stone counter in about 15 minutes.
Pick a spot near the sink or stove, since these areas see the most water and oil exposure and reveal wear first. Clean and fully dry that patch.
Place 3 to 5 drops of room-temperature water on the dry stone, spaced a few inches apart.
Wait 5 to 15 minutes without touching the drops, then look closely at each one.
If the water still sits in a rounded bead, the seal is intact. If it has soaked in, flattened, or darkened the stone underneath, it’s time to reseal.
Pro Tip: Run the test in two or three spots, not just one. Sinks and cooktop areas wear faster than the rest of the counter, so a single reading near the stove can trigger an unnecessary full reseal when only that section needs touch-up work.
For oil-prone stones like marble, a quick olive oil drop test catches early breakdown that water alone might miss, since oil-based stains often show up before water absorption does.
Once you’ve resealed, give the product time to cure before you go back to normal use. Most sealers allow light foot traffic near the counter after 4 to 6 hours, light kitchen use around the 24-hour mark, and full heavy use, including stacking dishes or running water directly on the surface, after 24 to 48 hours depending on the product label.
What Changes Your Countertop’s Sealing Schedule
Two identical granite slabs in two different kitchens can need resealing years apart, and the sealer itself is often the biggest reason why.
Sealer type matters more than brand loyalty. Basic penetrating impregnators need more frequent reapplication, while premium fluorocarbon-resin sealers can last multiple years on the same stone. This is a big part of why sealing advice online is all over the map: people are comparing different products, not just different stones.
Cleaning chemistry breaks sealers down faster than time does. Harsh alkaline or acidic cleaners strip sealer well before its expected lifespan runs out. Stick to pH-neutral stone cleaners instead of all-purpose sprays or vinegar-based solutions.
Household intensity moves the timeline in either direction. A kitchen island that doubles as a prep station and homework desk wears faster than a rarely used wet bar counter.
Climate and exposure add stress you can’t clean away. Coastal humidity and salt air, or outdoor kitchen UV exposure, both shorten sealer life compared to a climate-controlled interior kitchen.
Finish changes how visible the wear is. Honed (matte) finishes show staining faster than polished finishes because the surface texture holds more liquid contact time.
Pro Tip: If your household includes small children or frequent cooking with turmeric, red wine, or tomato-based sauces, test every 6 months regardless of the material’s “standard” range. Those stains penetrate porous stone faster than water does, so the water-drop test alone can underestimate your risk.
Sealing Tips and Best Practices for DIY Application
Getting the prep right matters more than the sealer brand you buy off the shelf; learn more about the importance of sealing kitchen cabinets for lasting results.
Clean thoroughly first. Wash the counter with a mild, pH-neutral detergent and remove any wax, soap residue, or old sealer buildup. Let it dry completely, ideally overnight, since sealing over trapped moisture traps that moisture under the new coat.
Patch problems before you seal. Small chips or grout gaps near seams should get addressed first, because sealer won’t fix structural issues and can actually make them harder to repair later.
Apply in small sections. Follow the product’s dwell time exactly, work one 2 to 3 foot section at a time, wipe off excess before it dries on the surface, and buff to a natural sheen.
Let it cure fully before judging the result. A sealer that looks streaky right after application often evens out once it finishes curing, so don’t panic and reapply within the first hour.
The most common mistake homeowners make isn’t skipping sealing, it’s sealing the wrong surface or sealing over a dirty one. Applying penetrating sealer to engineered quartz does nothing useful and can leave a cloudy film. Sealing over old, flaking sealer residue traps that layer underneath instead of replacing it. And piling on extra coats “just to be safe” causes a hazy buildup that’s genuinely annoying to strip back off.
Between sealings, the habits matter as much as the product. Wiping spills within 60 seconds, using coasters and trivets, and avoiding bleach-based cleaners all extend the working life of whatever sealer is already on your counter.
DIY vs. Professional Countertop Sealing: Cost and Time
A basic DIY penetrating sealer runs $20 to $60 and typically covers a standard kitchen counter with one or two coats. Professional application generally costs $100 to $300 or more, depending on counter size, how much prep the stone needs, and whether an old failed sealer has to be stripped first.
DIY makes sense for a homeowner who already knows their stone type, has a small to mid-size counter, and doesn’t mind a weekend project with drying time built in.
Professional service makes sense for large or heavily porous surfaces, stubborn stains that DIY cleaners haven’t touched, a previous sealer job that’s failing unevenly, or simply wanting a guaranteed, even result without the trial and error.
Time is the real trade-off, not just cost. DIY sealing eats a weekend once you count prep, dwell time, and cure windows, while a professional crew typically finishes the same job, including cleanup, in a single visit.
If your countertop has gone years without attention and looks etched, dull, or unevenly stained, that’s usually a sign the DIY route will take longer and cost more in trial-and-error products than hiring it out once.
What to Expect From Professional Countertop Sealing
Aosaveswoodfloors has handled countertop cleaning, polishing, and sealing alongside its hardwood restoration work since 2003, using dustless techniques and eco-friendly products on most jobs, many completed in a single day.
Before booking any countertop service, it helps to ask a few direct questions:
What sealer product do they use, and is it rated for your specific stone type?
How do they handle prep, including stripping an old failed sealer if one is present?
What’s the expected dry time before the counter can handle normal kitchen use again?
Do they test the seal (water-drop or similar) before calling the job finished?
With over 450 Google reviews built up across two decades serving central Illinois and the St. Louis metro area, Aosaveswoodfloors has fielded most of these questions before.
Signs Your Countertop Needs Resealing Beyond the Water Test
The water-drop test is the most reliable single check, but a few visual and tactile clues show up before you even grab a glass of water.
Dark rings or blotches around the sink and stove are usually the first sign, since those spots absorb moisture and oil constantly and show wear before the rest of the slab does. If you wipe up a spill and notice a shadow lingering where the liquid sat, even after cleaning, that’s the stone telling you it soaked something in rather than repelling it.
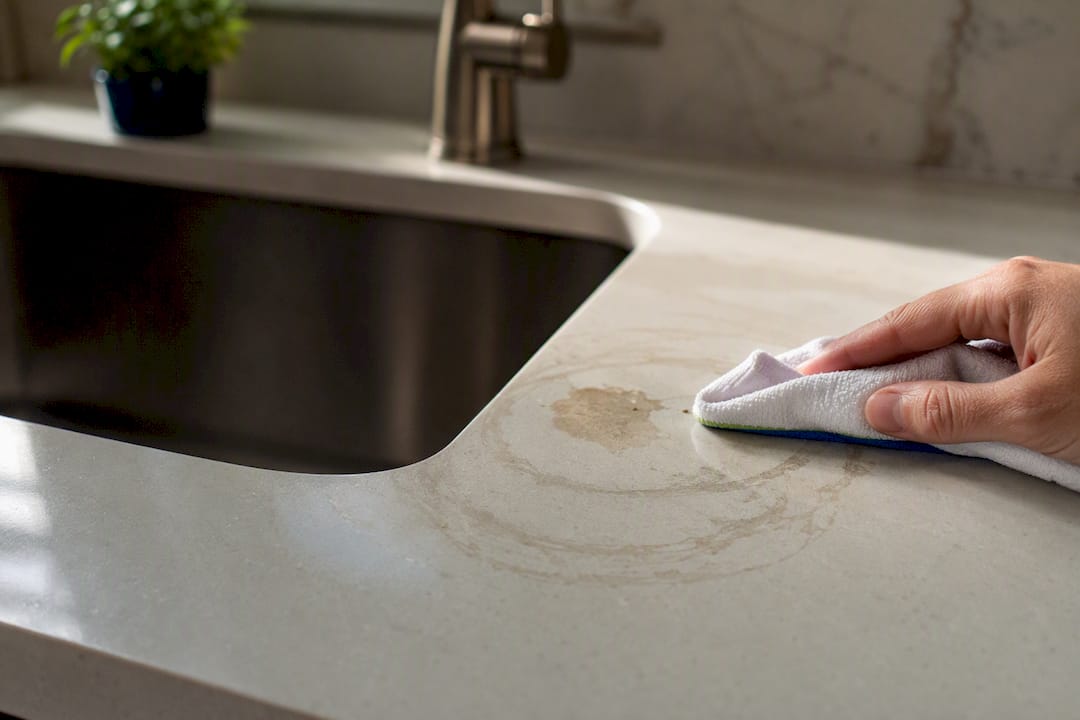
A dull or hazy patch where the counter used to have a consistent sheen often means the sealer has worn thin in that specific zone, usually a high-traffic prep area rather than the whole surface. Rough or slightly gritty texture changes matter too. Sealed stone typically feels smooth and slightly slick; when a spot starts feeling more like unfinished stone under your palm, the coating has likely worn away there.
Watch for new stains that show up faster than they used to. If a splash of coffee or wine used to wipe off cleanly and now leaves a faint mark even after quick cleanup, the sealer’s protective layer has degraded in that area. Similarly, if cleaning products that never bothered the counter before start leaving faint discoloration or dull spots, that’s a sign the sealer’s barrier is compromised, not that you suddenly have a bad batch of cleaner.
Any of these signs justify a water-drop test on that specific spot, even if the rest of the counter still beads water fine.
What Happens When You Skip Sealing Too Long
Stains are the most visible consequence, but they’re not the only one. Oil, wine, and citrus juice soak into unsealed or under-sealed porous stone and leave marks that no amount of surface cleaning removes, because the staining agent has migrated below the surface. On light-colored marble or granite, a single unattended cooking oil spill can leave a shadow that lasts for years.
Etching is a separate problem from staining, and it’s permanent. Acidic liquids, lemon juice, vinegar, tomato sauce, react chemically with the calcium in marble and limestone, dulling the polish in a dull gray patch regardless of how quickly you wipe it up. A sealer slows how fast that acid reaches the stone, but it doesn’t stop etching outright on calcium-based stones, which is why marble kitchens need both a sealing schedule and a habit of fast cleanup.
Bacteria and odor retention become a real concern in porous stone left unsealed near food prep zones, since microscopic pores hold moisture and organic residue that a wipe-down doesn’t fully remove. Over months, this can show up as a faint musty smell near the sink that cleaning doesn’t fix.
The financial cost compounds too. A stain that’s caught early often responds to a poultice treatment costing little more than the sealer itself. Left for a year or more, that same stain can require professional-grade stain extraction or, in bad cases, an area of the stone that needs to be re-polished or replaced outright, a dramatically bigger expense than staying on a reasonable resealing schedule would have cost.
Kitchen Use and Climate Change How Often You Should Reseal
The single biggest variable in countertop sealing frequency isn’t the stone catalog number, it’s how the kitchen actually gets used. A vacation home counter that sees light use a few weeks a year can stretch well past the standard interval for its material. A family kitchen with daily cooking, kids doing homework at the island, and a sink that runs constantly wears through sealer noticeably faster than the “typical” range suggests.
Cooking style matters specifically. Households that cook with a lot of oil, wine reductions, or acidic sauces put more stress on a sealed surface than households that mostly reheat or prep simple meals. If your stovetop area shows wear faster than the rest of the counter during a water-drop test, that’s your cooking habits showing up in the stone.
Climate plays a role that’s easy to overlook. Homes in humid or coastal regions deal with more ambient moisture working against the sealer over time, and salt air accelerates wear on any outdoor stone surfaces. Homes in very dry climates generally see slower sealer breakdown, though extreme temperature swings near a stove or oven vent can still stress the seal locally.
Outdoor kitchen counters face the toughest conditions of all: direct sun, rain, freeze-thaw cycles in colder climates, and often more porous stone choices to begin with. An outdoor granite counter can need resealing on a schedule closer to marble’s indoor timeline, even though the stone itself would last years longer indoors.
Building a Sealing Schedule That Matches Your Actual Usage
Skip the one-size-fits-all calendar and build a schedule around test results instead. A practical approach: run the water-drop test when the counter is first installed to establish what a fresh seal looks and feels like, test again around the six-month mark to see how much the seal has changed, then settle into annual testing or more frequent checks if the six-month result showed noticeable wear.
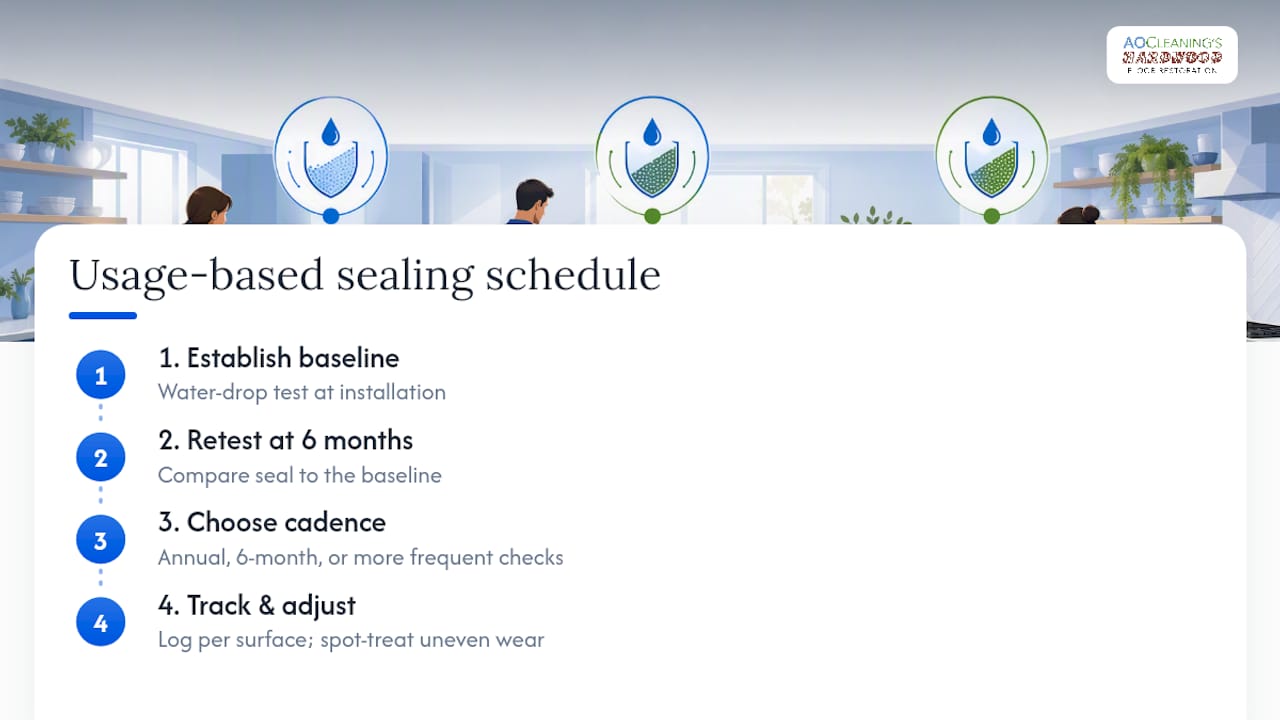
Adjust from there based on what you’re actually seeing. A busy family kitchen with a marble island might need to check every 6 months permanently, landing on the shorter end of that stone’s typical range. A guest bathroom vanity in dense granite might only need a check every other year, since light use and minimal liquid exposure slow wear dramatically.
Keep a simple note, even just a phone reminder, logging when you last tested and resealed each surface. Different counters in the same house, an island versus perimeter counters, indoor versus outdoor space, often need completely different schedules, and tracking them separately prevents both wasted resealing and accidental neglect.
If a water-drop test ever comes back inconsistent between spots, beading near the edges but soaking near the sink, that’s not a sign the test failed. It’s a sign your usage pattern has created uneven wear, and the fix is spot-treating that section rather than resealing the entire counter.
Why Testing Beats the Annual Sealing Habit
The “reseal every year” advice sticks around because it’s simple to repeat, not because it’s accurate. A dense, dark granite counter that gets sealed on a strict annual schedule is often getting sealer applied over a coat that hasn’t broken down yet, which wastes money and product without adding real protection. Meanwhile, a busy household with a porous marble island that follows the same generic yearly rule may be under-protected for half that year, taking on stains and etching the calendar never accounted for.
The water-drop test fixes this because it measures the actual condition of your specific stone, in your specific kitchen, under your specific habits, instead of a guess based on a marketing average. Where most guidance falls short is treating “granite” or “marble” as single categories, when slab density, sealer quality, and how hard a household cooks all move the real number by months or years in either direction.
If there’s one thing worth prioritizing over everything else in this guide, it’s testing before you buy anything. A ten-minute check with water you already have on hand tells you more than any product label or generic maintenance chart, and it costs nothing to run more often than you think you need to.
— Jim
Get Professional Countertop Sealing Without the Guesswork
If you’d rather skip the ladder of trial-and-error DIY products and just get a straight answer on your countertop’s condition, Professional services handle that testing and sealing work directly, often without locking you into a maintenance contract.

Some companies have spent decades working on hardwood floors and countertops in central Illinois and the St. Louis metro area, offering countertop cleaning, polishing, and sealing services that use dustless techniques and eco-friendly products, with most jobs completing in a single visit rather than dragging into a multi-day project. That matters if you’ve already tried a DIY sealer that streaked, hazed, or failed to hold, since fixing a botched seal job usually takes more prep work than sealing a clean slab from scratch.
While you’re at it, if your hardwood floors could use the same kind of attention, their clean and buff service tackles dullness and light wear without the cost of a full refinish. Call for a quote on either service, and mention what your water-drop test showed. It gives the crew a head start on knowing exactly what your counter needs.
Sources
Recommended

Comments